University of Notre Dame
Aerospace and Mechanical Engineering
ME 469: Introduction to Robotics
Robotic Vision Project
This project will use a calibration approach to using vision
for robot manipulator control. This is in contrast with "Camera
Space Manipulation" which is the subject of Dr. Skaar's research.
Calibration methods suffer from several shortcomings; on the other
hand, it is perhaps the predominant methods of vision based robotic
control in industry. (See the Adept vision
robot.)
To calibrate the vision based controller for the robot, you
will move the robot to a set number of configurations and instruct
the controller to save the image location of the robot as well as
its actual position in the plane. After the samples are saved,
the robot can be instructed to move to any image location. The
controller computes the actual location by interpolating between
or extrapolating from x and y coordinates saved in the calibration
step.
There are a variety of ways of using calibrated points to
control the robot, but here we will use a particularly simple
approach. What the controller does is find the two closest
saved sample points, and does a simple linear interpolation
separately for the x and y components of each.
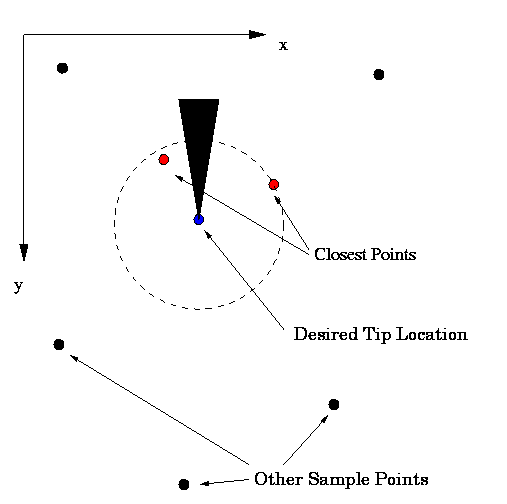
Each of the two closest points will have image and world
coordinated, respectively:
(x1,image,y1,image),
(x2,image,y2,image),
(x1,world,y1,world),
(x2,world,y2,world). Let the desired tip image
location be specified by
(xdes,ydes). Then simple, coordinate
decoupled interpolation gives the world tip locations by
((x1,world -
x2,world)/(x1,image -
x2,image))* (xdes - x2,image) +
x2,world
and
((y1,world -
y2,world)/(y1,image -
y2,image))* (ydes - y2,image) +
y2,world.
While seemingly straightforward, this method is fundamentally
flawed in a couple of ways. Hopefully your experimentation will
discover some of these. The purpose of this lab is to explore
the efficacy of the vision based calibration control strategy
described above.
Details:
- Log on to me469.ame.nd.edu using your group name and
password.
- rlogin or telnet to nomad.ame.nd.edu. You may have to do
setenv DISPLAY me469.ame.nd.edu:0
to set the display.
- Start the GUI by typing
puma
- Initialize the robot by following the instructions under the
initialize command under the file menu.
- After initializing, the vision window is started under the
vision file menu.
- The "Capture" button captures a new image;
- The "Threshold" button thresholds the image;
- To highlight the triangle on the "forklift" click on the
triangular region. This will identify the triangle and
compute the coordinates of the tip of the triangle as well
as its centroid.
- The "Save Sample" button saves the tip and centroid
coordinates as well as the configuration of the robot.
In order to be used in the calibration calculations, the
samples must differ from each other by at least 10 pixels
in both the x and y directions for the tip of the
triangle.
- After saving some samples the "Calibrated Motion" button
will cause the robot to move to any location specified by
clicking on the image plane. In order for the GUI to control
the location of the arm, the robot must be under computer
control, so you have my to hit the "comp" button on the teach
pendant.
- After setting everything up and getting it to seemingly work
properly, see how well such a calibration based approach works
by saving 2,4,8 and possibly more samples, and in each case record the
following data:
- The location and number of calibration points (these
should appear in the puma control window);
- The location of several calibrated motion points and an
indication of the amount of error, if measurable,
associated with the motion;
- A qualitative characterization of the error, e.g.,
- Is the error biased in a particular direction (left,
right, up or down)?
- Is the error greater in a particular region of space
or a particular region of the image, e.g., in the
periphery or the center of the image?
- Is the error greater if the controller has to
extrapolate from the calibration points rather than
interpolate between them?
- Does is matter where the calibration point are
located? For example, for the case of 4 calibration
points does the system work better or worse if they
are clustered together or spread apart? Does it
matter if they are arranged in a line or a polygon?
Try, for example, to calibrate four points in a square
near the center of the grid and then calibrate in a
square using the four extreme corners of the grid.
Does one way work better than the other, does each
work just as well, or does each have relative
advantages and disadvantages?
- To the extent there is error present, can you
identify a likely source?
- etc.
- After testing the system with 8 calibration points, if
you think that better performance will be gained by saving
even more points, try it with more calibration points.
- Finally, calibrate the system with enough points so that
it works with reasonable accuracy. Then move the camera
slightly (about 1/2 inch) in any direction. How much did
this impact the accuracy of the system?
- Write a concise, coherent and otherwise brilliant project report.
Return to the ME 469 Homepage.
B. Goodwine (jgoodwin@nd.edu)
Last updated: December 1, 1998.