ME 469 Project 1: "Pick and Place" and "Teach and Repeat"
In manufacturing assembly operations, robots often perform what is
called pick and place operations. As the name suggests,
the robot picks up a part and places it somewhere else. For
example, the robot may pick up a computer chip and insert it in
the appropriate location on a circuit board. The way to program
the robot to do this procedure is called teach and repeat.
You teach the robot the required moves one time, and then it
should be able to repeat the maneuver indefinitely. This project
is an simple introduction into the programming required to make
the Puma 260 in the robotics lab do this. This project should be
very easy, and is an illustration of the types of robotics
concepts that are necessary for industrial application.
Project objectives:
After completing this project, each group will be able to
- program proficiently in VAL, the programming language for
the Puma 260 robot in the undergraduate robotics lab;
- use the "teach pendant" which allows direct, "joystick-like"
control for the robot;
- use the graphical user interface "GUI" written for this
robot; and,
- provide suggestions for improving the GUI, which will be
the object of Project 2 for some groups.
This lab description is intentionally incomplete. To get the
robot to even move at all, at least one member of the group will
have to study the instruction manuals for the robot before you
attempt to program the robot to complete the project. Where
appropriate, this project summary indicates which chapters in
which manual are relevant.
The VAL Programming Language:
The Puma 260 robot was manufactured in 1983, and as such, is
somewhat dated. VAL is a lot like many computer programming
languages from that time: not necessarily cutting edge anymore, but
it is the evolutionary basis for robotic programming languages
today (such as V+), and as such, is good to know. A user can
control the Puma 260 in the lab five ways:
- direct control with the teach pendant;
- issue individual commands to the robot using a terminal
interface;
- write and store a program for the robot to execute using the
terminal interface and the built-in editor in the robot
controller;
- issue individual commands to the robot using the GUI; and,
- write a program on a work station using your favorite
editor, e.g., emacs, xemacs, textedit, xedit, etc., and
transfer the program to the robot through the GUI.
The first three methods are the traditional means for controlling
the robot and the last two are part of an on-going development
project for this class. This project will utilize each of these
methods.
You are encouraged to program the robot using any of the VAL
commands that you wish, but most likely you will use some of
the following:
     MOVE, MOVET, MOVES or MOVEST
     DRAW
     APPRO or APPROS
     DEPART or DEPARTS
     HERE
     SPEED
See Chapters 4 and 5 of the Programming manual (in the lab
near the Puma) for details of
each of these commands. Feel free to use other commands as well.
You may also wish to consult Chapter 6 of the Programming
manual for an example program.
Terminal Interface:
The computer communicates with the robot through its serial port.
To establish communication with the robot, start a terminal
emulation program, such as
minicom
The terminal must be configured with the following transfer
protocol:
    baud: 9600
    parity: none
    stop bits: 1
    bits: 8
    device: /dev/ttyS0
Minicom should have these for the default settings; however, if
you do have to change them, hit
control-a z
to pull up a menu. From there you can set the transfer protocol.
See the man pages for each program or ask the instructor for more
details (in that order).
To exit minicom, type
control-a x
Power-up, Initialization and Calibration Procedure
Once you have started the terminal emulation program, it is time
to start the robot (see section 3-5, page 3-26 of the Equipment
and Programming Manual for the step-by-step details). In summary,
you need to "initialize," "limp," "calibrate" and "ready" the
robot.
Important:
- do not turn on the robot until after starting the terminal
emulation program as instructed in the initialization procedure
in the programming manual;
- make sure the the arm is
supported, i.e. someone is holding it or it is in the
nest position, before running the
LIMP
command; and,
- never set the speed dial on the teach pendant above 10:
- on the teach pendant, the dial should be at 10 or less;
- when calibrating the robot as outlined in section 3-5,
make sure you typed
SPEED 10
- and the first line of every program should be
SPEED 10 ALWAYS
After a program is completely debugged, you can set
the speed higher, but never more than 50.
GUI:
The GUI walks you through the initialization procedure by way of a
series of pop-up windows after you choose "initialize" from the
File pull-down menu. After the robot is initialized, you can
issue single commands from the Action pull-down menu, or transfer
a VAL program from the Program menu. To start the GUI program,
type
puma
at the prompt on the computer. Unfortunately, the GUI is not
completely debugged, so occasionally things may go awry.
Important: do not turn on the robot until the GUI tells
you to.
To download a program to the robot controller using the GUI,
under the "Program" menu you will find "Transfer" which allows
you to download a program from the PC to the robot controller.
Under the same menu, you will find "Execute" which executes the
program that is downloaded.
What you must do:
In the lab (357C Fitzpatrick) you will find the robot and the
computer. If you have not already done so, you must get an
account on the computer for your group. There is a small
"fork-lift" end effector attached to the end of the robot. Using
that, you are going to program the robot to lift the small
"pallets" from some starting position and place it in some final
position.
- The first task is to program the robot to "swap" two pallets as
illustrated in the following figure.
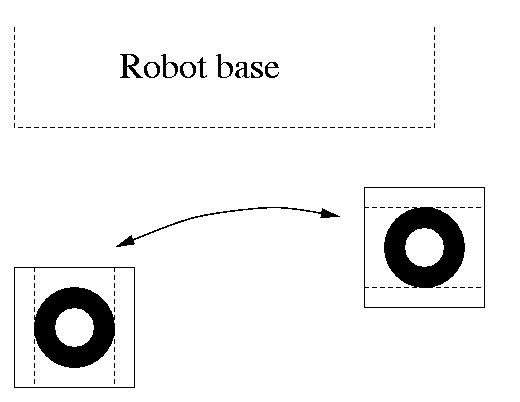
There are markings on a sheet of paper taped to the base that
indicate the initial positions of the two pallets.
Outline: using the manual control pendant, you will be
able to manually direct the robot through the steps necessary to
swap the pallets. Using the
HERE point_name
command, (where point_name is something like "p1" "p2" etc.) you will be able to name or define the various points,
which then could be used in a program with the
MOVE point_name
command to have the robot automatically go through the sequence of
steps necessary to swap the pallets. The program must start and
end in the "ready" position.
Hint: sections 2-4 and 2-5 of the Programming Manual
contain an example program which will be very helpful.
Also, near those sections is a description of how to use the
editor used to program the robot.
Hint: there are "program commands" and "monitor
commands." To execute a program command directly from the
terminal, prepend the command with "DO," e.g.
DO MOVE POINT2
will make the robot move to POINT2. You cannot just type "MOVE
POINT2."
Once you have defined the points, written the program and
successfully swapped the pallets one time, you should see how
many times in a row you can repeatedly swap the two pallets
without interfering. Part of the grade depends upon how many
times you can swap the pallets in a 5 minute period.
Use the command
EXECUTE program_name
to execute the program. To run a program repeatedly, use the
command
EXECUTE program_name,n
where n is the number of times you want it to repeat.
To stop an executing program, type
ABORT
and the robot will stop at the end of the current command.
- The second task is to use the GUI to download a program
written with a text editor to the robot and then execute the
program. The program may be the same as the program which
swaps the pallets, or a different one.
All the commands are the same for the GUI except the
addition of one more command, which allows you to
numerically define points. The new command is
DP
and its use is illustrated in a sample program.
Grading:
The total grade the project is 100 points. 80 points will be based
upon the results presented in a report written consistent whit the
report
guidelines. The allocation for the final 20 points is based
upon the following 2 considerations:
- 10 points will be given to the group that is able to swap
the pallets the most number of times in a 5 minute period, 0
points will be given to the group that swaps them the least
number of times and the score for all the other groups will be
linearly interpolated between the two extremes. Important:
the maximum speed setting in the program is 50 and the
procedure must start and end in the READY position. Using
faster speeds can damage the robot.
- 10 points will be given to the group that writes the
shortest program that is able to swap the pallets at least once,
0 points to the group with the longest program and the score for
all the other groups will be linearly interpolated between the
two extremes. Again, the robot must start and end in the
READY position. Note: this program may be different from
the one designed to swap the pallets the most number of times.
Return to the AME 469 Homepage.
Bill Goodwine (jgoodwin@nd.edu)
Last updated: January 18, 2000.